
|


ICF and NIR sensitivity
Most normal camcorders can be also used for "seeing-through" under specific environments, for example, in bright day light abundant in NIR. This is because the ICFs inserted in normal camcorders don't block out NIR 100% and some degree of NIR can still pass through. Once again, note the graph below. The graph shows that NIR in the range from 690nm to 1200nm still reaches a normal camcorder's CCD after passing through the ICF.
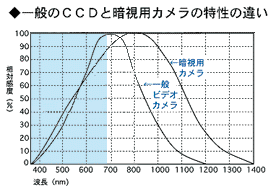
All ICFs inserted in camcorders do not have the same NIR blocking efficiency. An inefficient ICF enables much more NIR to pass through and this means better see-through images. Thus, the efficiency of the ICF is inversely proportional to NIR sensitivity. Specifically, this inefficiency of ICF is the most decisive factor among many other factors having influence on NIR sensitivity of a camcorder.
In other words, you will get good see-through pictures from a camcorder which has an inefficient ICF, or (better still) with the ICF removed or displaced (as in a Nightshot camcorder).
Checking the NIR sensitivity (inefficiency of ICF)
The NIR sensitivity can be measured by simply taking pictures of your TV remote controller's transmitting lamp (facing you) with your camcorder. If you press a button on your remote controller, the transmitting lamp will emit NIR. A NIR signal can hardly be seen by a naked eye but can easily be detected by a camcorder's CCD. Thus, if the transmitting lamp appears bright on the viewfinder or LCD screen, your camcorder's NIR sensitivity is fairly good. The highest sensitivity level starts from the bright white, hazy white, yellowish glow to the lower sensitivity level of the red colorings. If the lamp appears very dim on the viewfinder, then this means that your camcorder has a very efficient ICF. Photographing an automobile's break lamp in the evening could also be another good way to measure the NIR sensitivity. If the break lamps look brighter on the viewfinder compared to a human eye, then NIR sensitivity is good.
You can also infer the NIR sensitivity level from your camcorder's minimum illumination (relative amount of light that will produce a viewable image). If your camcorder's minimum illumination is under 4-5 Lux, you may expect a pretty high NIR sensitivity.
Taking see-through pictures with a normal camcorder
If your camcorder's NIR sensitivity turned out high you can take see-through pictures with your camcorder under limited conditions. These conditions include the use of a proper PF (PF4 has to be used on a normal camcorder) and environments abundant in NIR light. As mentioned above, there is a big difference between Sony Nightshot and normal camcorders in NIR sensitivity - this is almost entirely due to the removable ICF -. However, in our example environment "A", below (abundant in NIR), there is little difference between Sony Nightshot and a normal camcorder in the efficiency and distinction of see-through images.
| Environments | Amount of the emitted NIR | Detailed examples |
| A | Highest | By a summer beach or outdoor pool, when the direct sun light is strongest. |
| B | High | Clouded summer's day outdoors / Sunny Spring or Autumn day outdoors. |
| C | Fair | Clouded Spring or Autumn day outdoors |
| D | Lowest | Indoor pool / Indoors where a glow lamp, mercury lamp or nitrogen lamp is installed. |
If you can set the camcorder to its highest gain level or adjust the shutter speed to a slower setting (for example, to 1/30 or 1/15 second) manually, the differences will be less apparent. - The default value of most camcorder's shutter speed is 1/60 or 1/50 second (light traveling and reaching the CCD 60 or 50 times per second) - However, a shutter speed which is too slow (for example, 1/8 or 1/4 second) will give moving objects a very blurry look. Therefore use of a slow shutter speed is recommended only for fixed objects.
In environments C and D, there is a very big difference between Sony Nightshot and normal camcorder. Though your camcorder has high NIR sensitivity, it is impossible to get acceptable see-through images in environment C or D without adjusting the shutter speed to much slower setting (for example, 1/8 or 1/4 second) manually. Therefore, in principle, it is impossible to take see-through pictures of moving objects in these environments. If you want to get acceptable see-through images of moving objects in environments C and D as well, you need to modify your camcorder to be more like a "Nightshot" camcorder.
Modifying your normal camcorder for the perfect NIR sensitive camcorder like Sony Nightshot
Modified camcorders will allow you to get the best see-through images under any NIR environment just like a Sony Nightshot. The purpose of modifying is quite clear and simple. You just need to remove the ICF installed in-between optical lens and the CCD. You can easily distinguish this ICF from any optical lens. The reason is that most optical lenses are crystal-clear while the ICF has either a cyan (light blue) or deep blue tint to it.
In rare cases, some ICFs have purple tint on them. Yet, in any cases, if you find any color tinted glass while you are disassembling your camcorder, you can just assume it to be the ICF you were looking for. The shape of ICF can vary. It can take the form of a circle, square, hexagonal or an octagon. After removing the ICF from your camcorder, when you install the PF1 or PF2 (PF4 is not suitable for modified camcorders) onto your object lens, you can soon take see-through pictures under any NIR environment. The images will be clear in distinctive black and white.
However, the following facts have to be regarded before modifying. Camcorders without an ICF can take see-through pictures and "see" at night time (with an additional IR Illuminator like Sony HVL-IRC) but give strangely coloured images under normal conditions. This is because when there isn't ICF, too much NIR reaches the CCD. It's the reason there is an ICF installed in the first place.
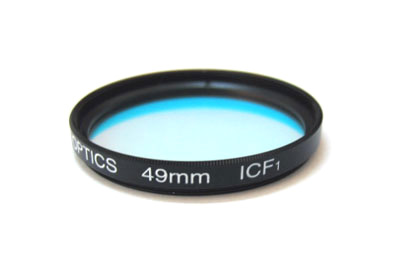
It is recommended you to put the ICF back in the camcorder after taking see-through pictures. These procedures may seem too much trouble, which is why we also sell our own "ICF1". The ICF1 is an external IR Cut Filter that promises the same kinds of images as before the modification. Its compensating effect is almost exactly the same as the IR Cut Filter already installed in your camcorder.
Modifying Procedure - Click here to see the original large formatted images together.
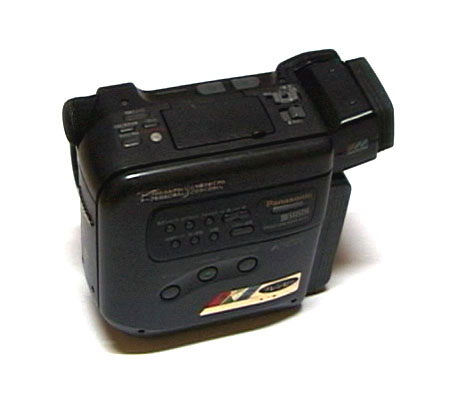
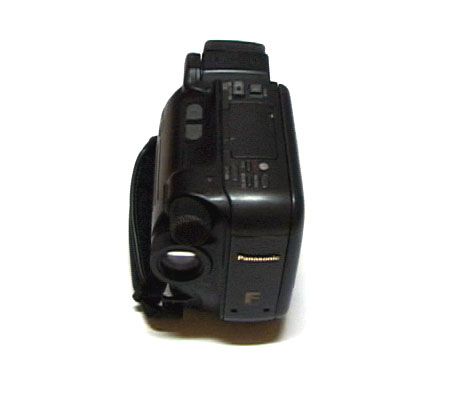
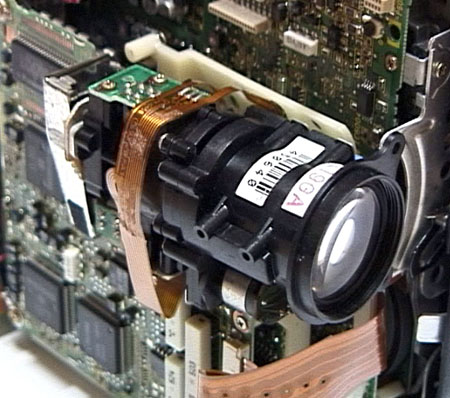
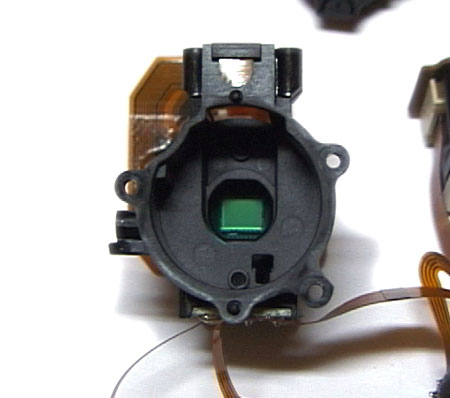
Below is Panasonic camcorder model, NV-S2.
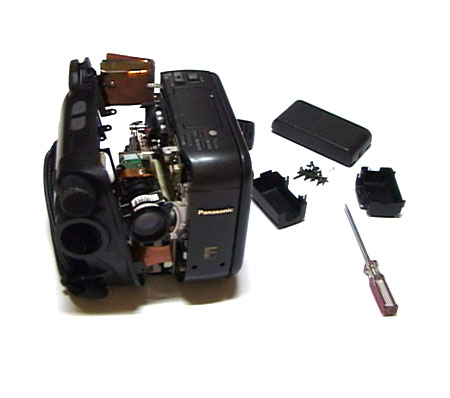
Unscrew the main body parts of the camcorder. Note that there are many plastic hooks as well as screws in most camcorder models. So don't force anything!
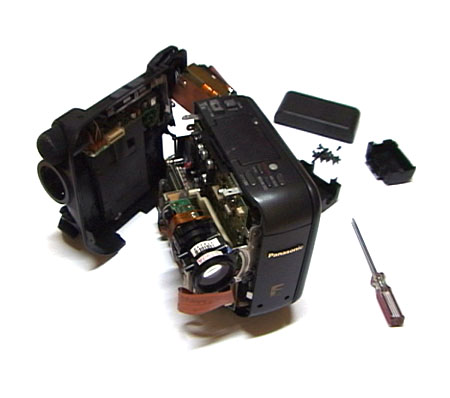
Here you can see the optical lens/CCD assembly.
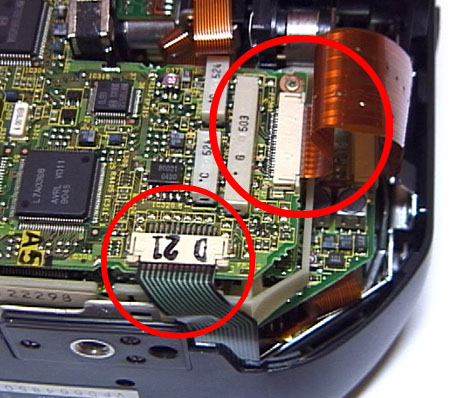
To separate the optical lens/CCD assembly, disconnect all ribbon cables or wires attached.
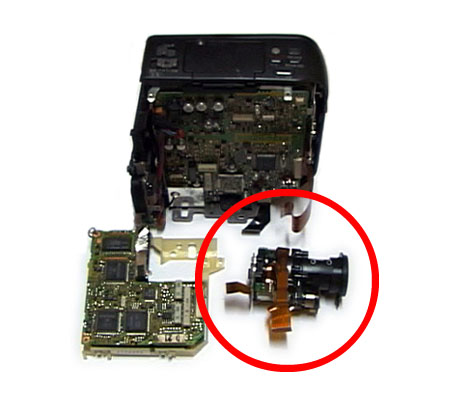
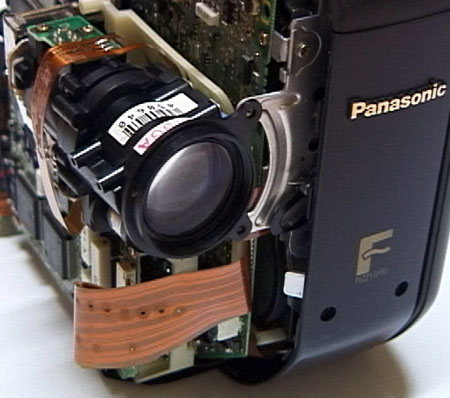
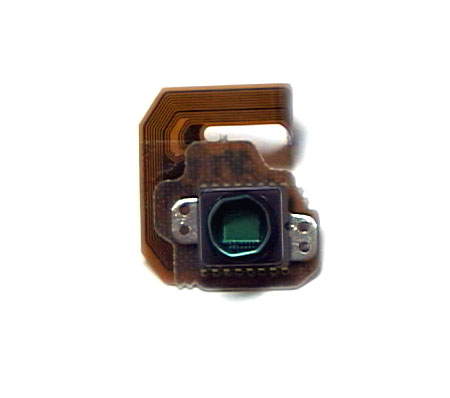
Separate the CCD assembly from the optical lens assembly.
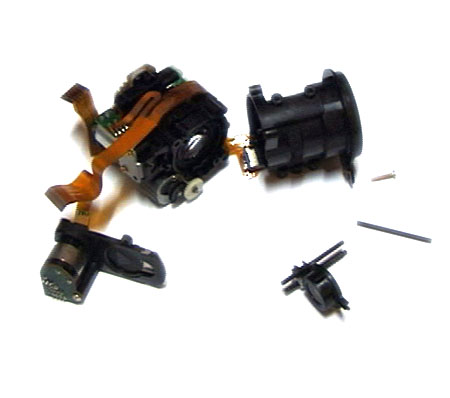
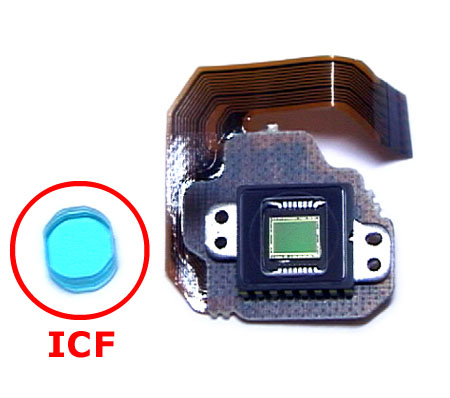
The ICF is always located in front of the CCD. You can see the ICF, with its light blue tint, attached directly to the CCD chip, below. Remove the ICF. In some cases, the ICF isn't attached to the CCD chip directly but may be somewhere inside the CCD assembly at a short distance from the CCD chip.
Reassemble the parts back together and power it up. You should see normal operation. If you can't see an image through the viewfinder, you most likely didn't quite align a ribbon cable or wire properly. Once you have everything back to normal, confirm the colors through the viewfinder or LCD screen. They should be somewhat reddish. If you made it to this point, now you have an equivalent to a Sony Nightshot camcorder. After attaching the PF1 or PF2 onto the object lens you can take see-through pictures. If you want to get normalized images like the ones before the modification, simply attach a suitable size of our ICF1 onto the object lens instead of the PF filter.
A Few Tips before Modifying
You have to be cautious in handling all the parts while modifying. In Japan, any damage done to the internal parts does not qualify under the warranty, but it's not the same in all countries. If you are at all unsure of this procedure, or not feeling brave enough, you should be able to take the camera to a suitable repair shop and ask the technician to remove the ICF for you.